


Gun Skins
Posted by Junior Shooters
By: Brody Loftin(13)
Check out their website by clicking the link at the end of this article.
“Nothing like going a little crazy with a changeable design on your gun.” GunSkins have great benefits for the consumer, environmental blending without reflection, protecting your gun, makes your gun more personalized and is easy to install or remove product. I would like to show you how easy this product is to use. I am using the AR-15/M4 skin with a skull design. When you shop for the perfect skin for you, there are all types of designs for different rifles, pistols and accessories for your gun. It is best for you to take the rifle apart to smaller pieces for easier handling.
 Before you begin make sure you go to the website youtube.com/gunskins and watch the video prior to any installation. Make sure you have a couple hours of uninterrupted time to complete your project. You will need to purchase the correct GunSkins for your product you will be covering, your weapon, you may also need: a sharp hobby knife, a heat gun (or hair dryer), a gun-specific degreaser, gloves and towel.
Step 1: Clean the Gun Thoroughly
It is not required to strip your firearm, but cleaning your weapon is pertinent for the easy installation to begin. The most important thing you can do is preparing the surface by degreasing the gun. We do not recommend using rubbing alcohol alone, as this will not cut through gun oil. Make sure to be thorough in cleaning every area you intend to wrap. Use a small brush to ensure detail part areas, like ribs or texture, get properly cleaned. Wearing gloves will keep body oil off weapon.

Getting the gun ready to apply the GunSkins.
Step 2: Peel & Stick
Preheating the weapon area slightly prior to applying product make this process easier. Pay close attention to each section and where the template fits on weapon. The wonders start to happen when you use the heat gun to apply heat to the GunSkins. Doing this activates it and allows for greater flexibility and form. The vinyl will relax and take shape of whatever is on the surface. Press in with your fingers and bring out the detail on the butt stock receiver, for end, and barrel. The end is tricky because of the round shape at the front end.
To achieve a wrinkle-free for end, middle piece along the bottom and work you’re way outward, creating tension as you heat the material and pull tightly. When you get to the front, it will require more heat and pulling as you work the material outward along the round edges, working away wrinkles outward as you go. Wrinkles are caused by an excess of material and not enough surfaces to lay it on.
 Step 3: Trim Excess Material
Every rifle is unique and will require trimming away of the material to make fit your specific model. GunSkins have tried their best to design each template to cover as much surface area as possible, because it’s better to trim away excess material than to come up short.
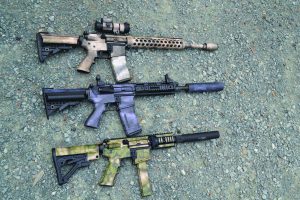
A variety of available color mixes GunSkins has for Modern Sporting Rilfes(MSR(ARs))
Step 4: Heating things up
During the repetitive installation process of peeling, placing, and trimming, it’s true heat that helps the material to conform around edges and difficult corners. The more heat you apply to the material, the more flexible it becomes. However, heat also plays a role in achieving a long lasting bond between the vinyl and the surface. After installing the entire Rifle Skin, it is required to hit the entire thing once more with heat in the final step: the post heat.
 Tips & Tricks:
- Complete a small project first to get familiar with product.
- Have room temperature to comfortable level, less time to heat weapon.
- Turn off ceiling fans to prevent dust from landing on clean surface.
- Apply heat to the surface of the gun prior to placing the pieces.
- If there is air trapped underneath the material after being set in place, it can be easily fixed by pulling up gently on product and rework material, may need to apply additional heat.
- You will need a needle or tip of hobby knife to relieve any air bubbles that may occur at the edges of the hexagons
- Use degreasers, such as Froglube solvent or Gun Scrubber. Use a small brush and scrub it well, especially in the recessed edges, pins, grooves, and other areas where buildup is likely to form.
- A typical install requires at least three or four blades for your hobby knife. Change blades frequently.
- Hold the vinyl into place after heating it (using a towel or foam to protect your hand) and letting it cool completely. This hardens the vinyl, locks it into place, and allows it to be cut away without tearing or stretching.
As per GunSkins policy, If you are unhappy with your installation or finished result for any reason within the first 60 Days of purchase, please contact GunSkins right away for a refund with original receipt.


Comments
Leave a Reply
Please note: Comment moderation is currently enabled so there will be a delay between when you post your comment and when it shows up. Patience is a virtue; there is no need to re-submit your comment.
You must be logged in to post a comment.